Did I choose the wrong film?

When I drove home from work today, I noticed that the contrast between the December darkness and the artificial light from lamp-posts, lit buildings and petrol stations actually would make very nice images indeed. I thought about going for long exposures with either Tri-X or HP5 plus, and I composed some nice images in my head. My chosen subject, Skibladnerhuset.

Skibladner is an old paddle steamer the people who lives around the lake Mjøsa are very proud of. It is currently the oldest paddle steamer in scheduled traffic, and it will sail on the lake in the summer months. When the winter comes, it will be parked on display in its own, specifically designed house. A special building with I find to look incredible with its triangles and diagonal pillars and poles. The house was drawn by the architects at Kontur in Gjøvik and was built in 2001. It has become a landmark for Gjøvik and is visible from RV4 as you drive through the town.

I chose to roll up the Zenza Bronica ETR with a roll of JCH Streetpan 400, and test out how an extremely contrasty film would deal with the lighting conditions in a Norwegian December afternoon. In retrospect, this might have been the wrong film for this outing, I should have gone for Tri-X og HP5 plus.

Reklamer

First of all, I could not find any information about the reciprocity features and long exposure compensation anywhere. Therefore, I went for combining the information from the Ilford HP5 plus and Kodak Tri-X. This means compensation from 1 second and more. My logic became – If the meter gives me 1 second, I’ll shoot 2 seconds, if it gives me 2s, I’ll go for 4. It could seem; however, that this was not anywhere near enough compensation.

Marina light – Zenza Bronica ETR w 50mm Zenzanon f2,8 – JCH Streetpan 400@400 1 second at f8

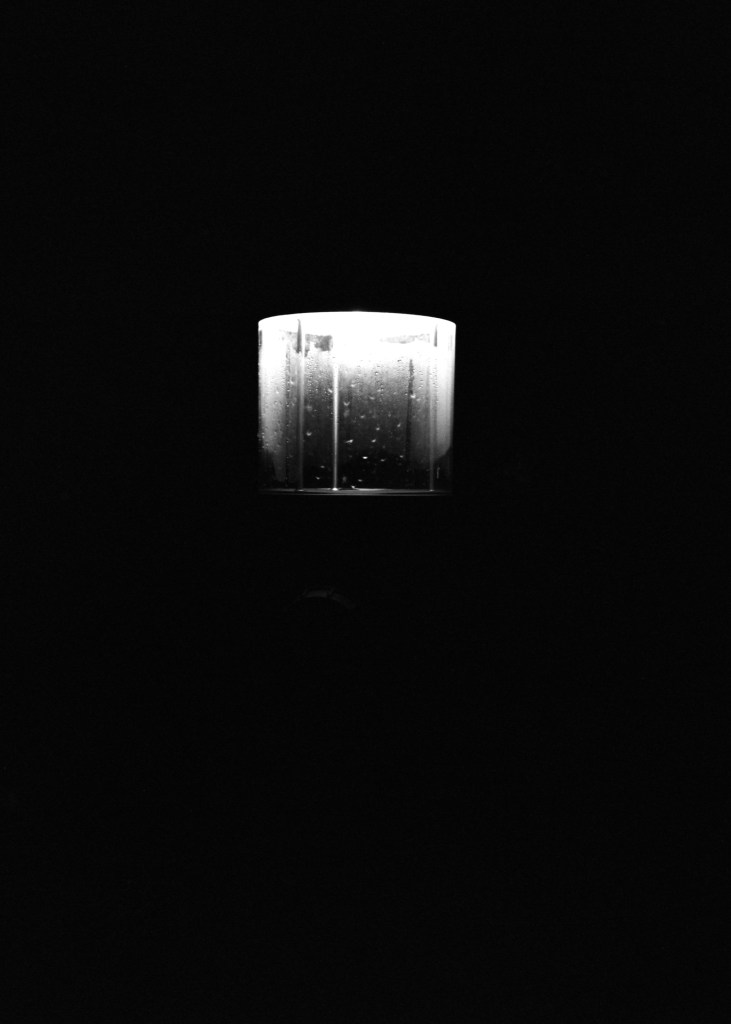
My negatives got very thin, so thin, that I wouldn’t imagine printing them in the darkroom. Three negatives came out reasonably OK, and showed the contrast level I was aiming for, however, the other 12, not so much.

I developed the film in Xtol stock, both because I have a batch of Xtol that is about to go out and I want to use it, and because I just did not «love» the prospect of doing development for 17 minutes with 30s agitation frequency. Call me lazy, but this is who I am.

I also considered using Rodinal 1+100 and do Semi-Stand development, but I wanted a more specific development cycle that I knew would give me the correct film-speed. And with Rodinal at that dilution and development times of an hour plus, I don’t really get that level of control.

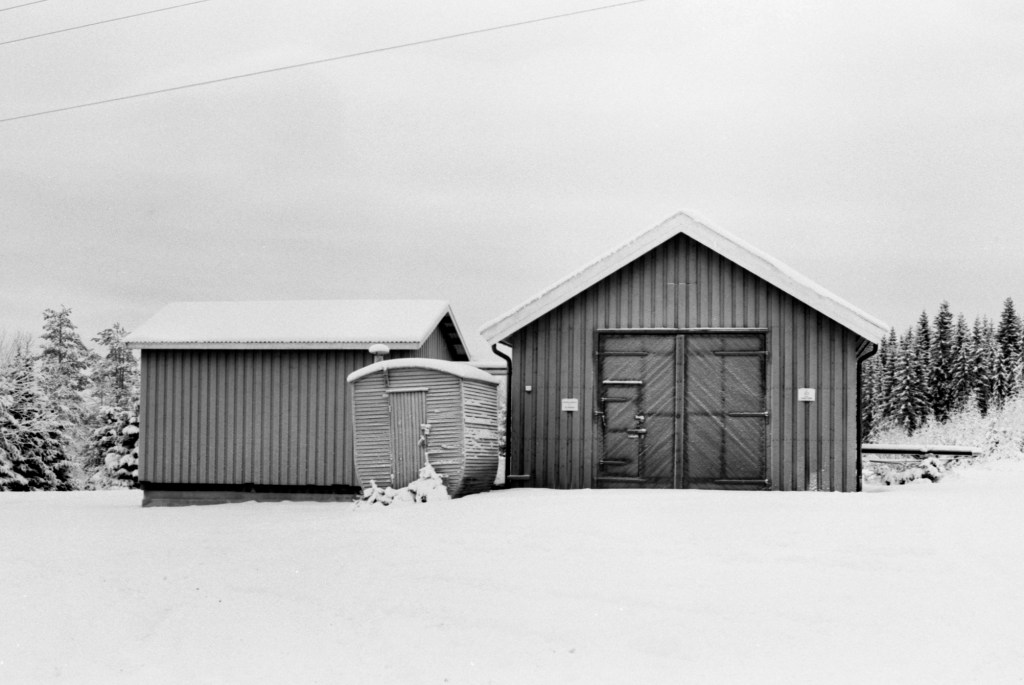
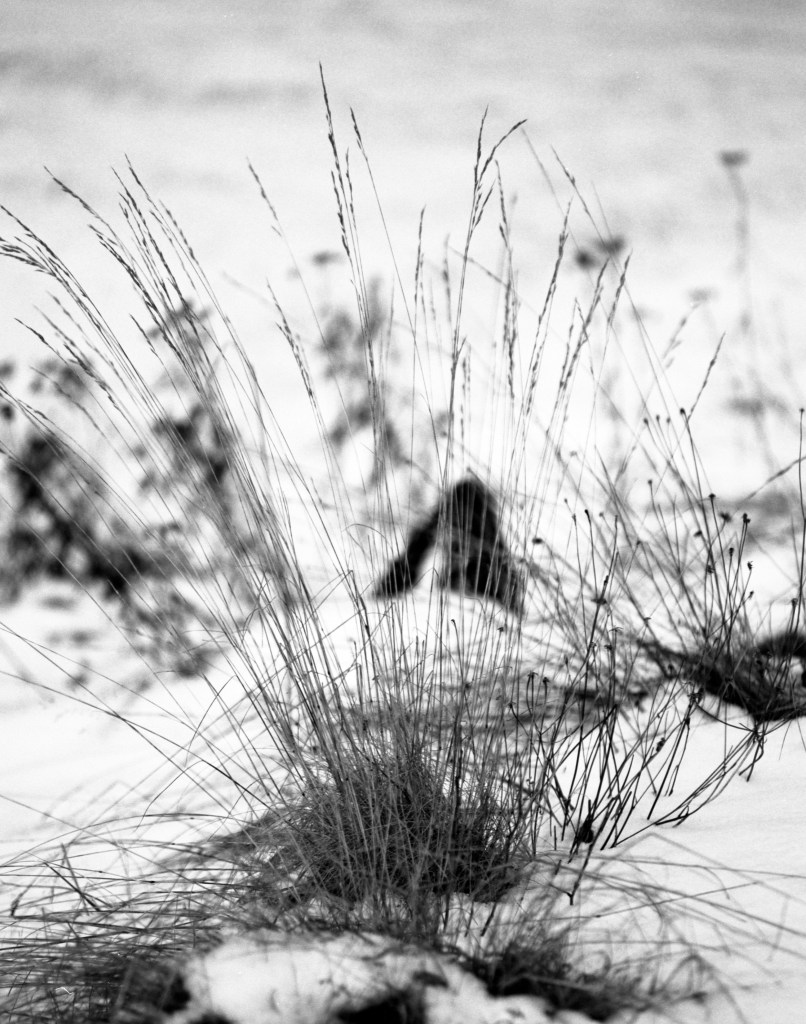
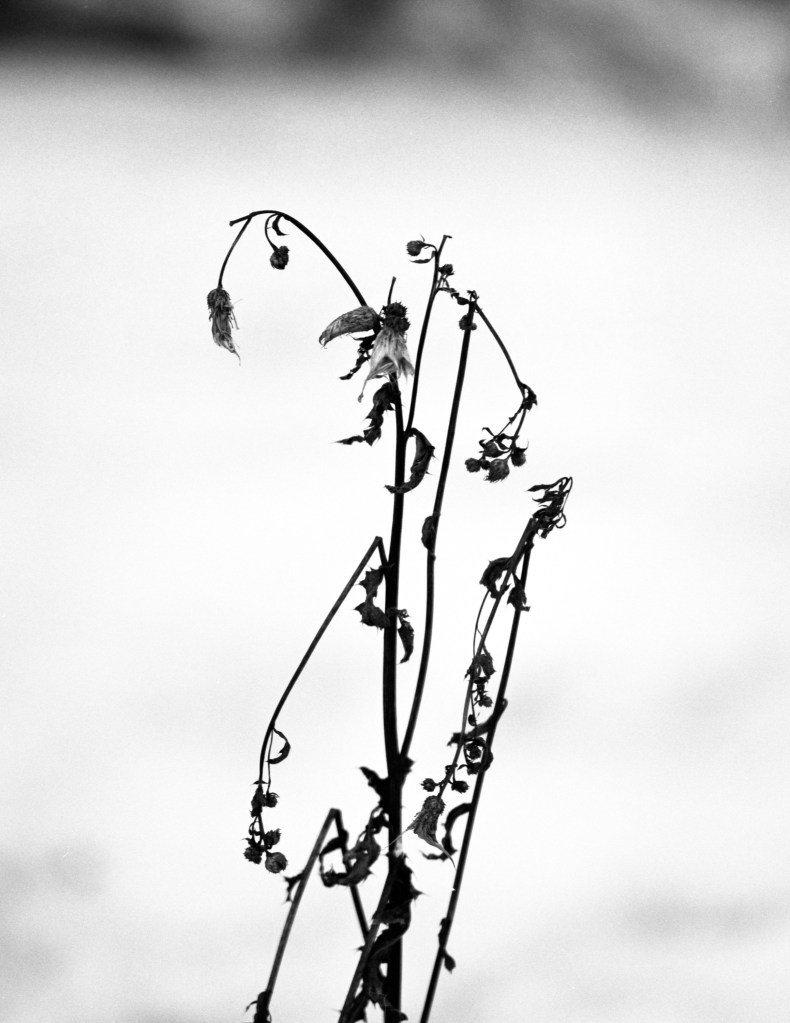
This was just an experiment and a shot in the dark (pun intended), but I learnt quite a bit about the Streetpan 400, and when not to use it. I might do a reshoot of this outing with a roll of Tri-X at some point, to pay the amazing architecture the respect it deserves.

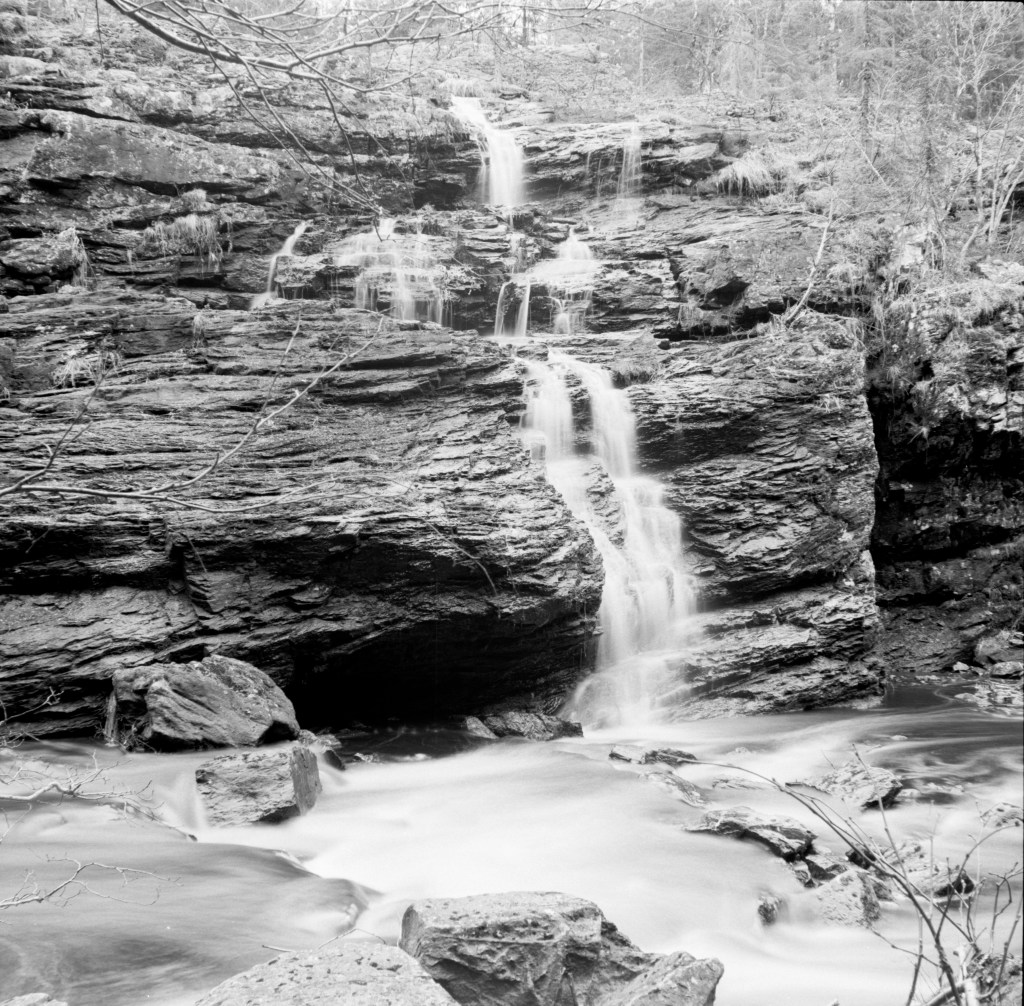
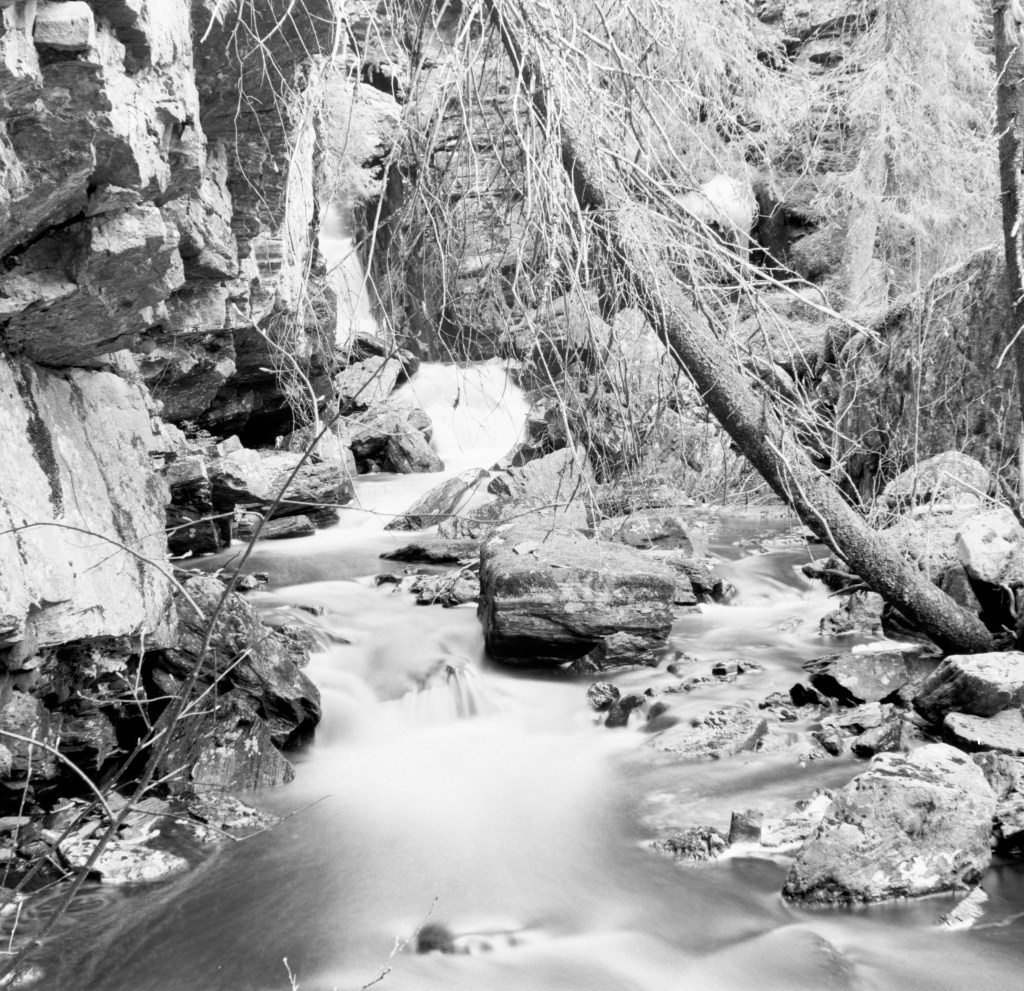
Please enjoy the images.

Working with a slow film

I have shot some slow films before, especially PanF 50 and I love the way a slow film looks. Smooth, calm, invisible grain and deep contrast. I also love how they allow me to shoot with very open apertures and longer shutter-speeds without having to compensate using ND-filters.

A film I have tried some times before without success is the «Rollei RPX25». I bought some rolls of this film for my medium format cameras, and my experience was not that great. One of the films turned out to be incorrectly cut and was more or less impossible to reel for development, and when I finally got it reeled and developed, it had the nastiest mottling I have ever seen. From some research online, I understood that this problem could be down to lack of prewash. Wiser and happier, I went on to try another roll, but on this one, I got nasty camera-shake even though the camera was mounted on a tripod and triggered using a release cable.

Some weeks ago, I bought a few rolls of RPX25 for my 35mm cameras, and today I set out to try it.

My equipment for the day. Olympus OM-1 w 50mm Zuiko f1,8 and the Rollei RPX25 canister.

I wanted to try this film out in a snowy winter environment, to see if I could tame the contrasts the film gives and end up with a contrasty, but nice winter shot. I chose to shoot at f8 with a yellow filter, to have some aperture to go on, as well as not shooting very long shutter speeds. The yellow filter is also very helpful to shape the contrasts. To be on the safe side, I bracketed the shots to be sure I get something.

Reklamer

So why did I chose the OM-1? I chose this camera because I wanted a reliable camera that I know is fairly accurate both at aperture-settings and shutter speeds. I don’t worry too much about this when I have films I know and that has some latitude, but I was very unsure how this film would handle potential under-exposure, and chose to play it safe. I exposed the film at 20 ISO, which is the lowest my light-meter would go, and developed as shot at 25. My negatives were contrasty but actually rather good looking.

Here are some shots.

I am very happy that my shots didn’t completely blow out the white snow, and the yellow filter helped me keep the detail in the overcast sky, without adding too much extra contrast to the already dark buildings. I am happy with this try-out, and I will finish the roll at another time.

If you want to join the shooting and hear some Camera-babble, a video will be available on YouTube shortly.

Going minimalistic with Delta 100

Today as I was relaxing, enjoying a cup of coffee, I looked out the window. The first fall of snow has just blessed us with its arrival, and this always brings new objects to my attention. Things that I maybe haven’t noticed because it is hidden in the November-browns.

Today my attention was drawn towards some wilted plants. Their very dark brownish colors made a nice, almost minimalistic, tone towards the snowy background. I immediately ran to put a roll of Ilford Delta 100 into my Bronica ETR. I also fitted it with a lens I just bought. a Zenzanon 150mm f3,5. Equivalent to around 90mm at a 35mm camera, and used a yellow filter to get the minimalistic contrast that I was looking for.

Zenza Bronica ETR w 150mm Zenzanon f3,5 + Yellow filter. Ilford DD-X developer

I aimed to keep the snowy areas around zone 8-9, to not completely blow it out, and my dark areas around zone 3-4 to retain some shadow detail. I got fairly good negatives, but I would have loved to have retained some more detail, especially in the most contrasty images.

Reklamer

Once again I chose to develop Delta 100 in DD-X developer, and this time as well, it gave me fabulous negatives. I am really looking forward to working with some of these images in the darkroom, and I expect to use lower grade filters, or maybe some split grading to get the most out of the negatives. A spot on my wall is already prepared for one of these images.

Once again. Thanks to Bjørn for sending me these films and the developer to test. I do really love the results it gives.

Messing up a test

Testing old, cheap cameras is always exciting. Sometimes they work, and sometimes they don’t, but in mist cases, you get something. In this test, I got something, but I managed to damage the film when winding it out. More of that to come.

Some weeks ago, I found an interesting camera on eBay, that I had never heard of before. The camera is called «Condor I» and was produced in Italy from 1947 by the Italian manufacturer of optics Officine Gallileo. After a while, Ferrania entered and most of the cameras were sold with the Ferrania logo on it. Mine, however did not. Whether this means that mine is among the earlier cameras, I don’t know, but – in mild terms – the camera does have some patina.

My dirty and somewhat tatty copy of the Condor I.

The first thing that really struck me when I played around with this camera, was the unusual selection of aperture stops. 3,5 and 4,5 are not that strange, but 6, 18 and 25 are stops I have never seen before on any manual camera. However, the aperture selector is the only part of this camera that is easy and smooth to operate. It seems to me that this camera has not been used for a long while, and that it will take some «jiggling» and maybe some sewing machine oil to get the focusing mechanism and the shutter speed dial to move with ease.

Reklamer

After cleaning both the rangefinder windows (there are two of them on this camera) and the viewfinder window as well as a light wash with some glass cleaner over the whole camera, I loaded it with a roll of Rollei Retro 400s. Previously this day, I had spotted two lines of bicycle stands that I thought had an interesting look to them. I decided to shoot some frames, cut the film out of the camera and develop the film to check whether it does work.

So far so good, I shot some frames and went home ready for developing the film. I loaded everything I needed into the changing bag and cut the film out of the camera as intended. But for some weird reason, the take-up spool would not accept the «rewind setting» and roll backwards. I fiddled a bit with it, and after a little while, the film spun up into my hand, and I was able to carefully wind it off manually. It does seem, however, that I was not able to do this carefully enough. I got nasty scratches and marks on my negatives, and I can only blame myself.

Condor I – Rollei Retro 400s – Xtol 1+0 9.30 at 20 degrees

The nasty scratches aside, the lens seems very sharp and the exposures fairly accurate from what I would expect with the settings. All shots are f4,5 at 1/100th and the Rollei film is shot at box speed. Also, the I love the smoothness of the grain I see in these scans.

I do definitely have to take this camera on a new test. The images seem to be decently sharp and pleasant for a messed up shoot like this. I’ll make a video about this little quirky camera and my next time shooting it.

Printing lonely leaf

In my previous entry, I went out in the grey, misty Norwegian November to take some calm and pleasant pictures with my Bronica ETR and a roll of Ilford Delta 100. I also tested a new developer, Ilford DD-X, and I was very pleased with one of the images. So pleased in fact, that I decided to take a trip into the darkroom to make myself a print for my own wall at home.

The picture I chose to work with.

I brought along my GoPro and made a very basic and amateur video coverage of the darkroom session. My video skills are not good, and this is actually the first time I have tried to mount together a video in this way. I might do more of these.

Reklamer
My very amateur video. Please enjoy.

Silky water with Fomapan 100

I have written a lot about Fomapan 100 on this blog. This is a film I absolutely love shooting, and that I have found to have some really nice qualities such as insanely fine grain when developed in Xtol stock, a rich and wide exposure latitude, that makes it very pushable and pullable. An obviously, the fact that this film is an absolute bargain with its low price.

Back in the beginning of May 2020, when Norway woke up from lockdown, I brought my Zeiss Ikon Nettar 6×6 camera out to a location, to test longer exposures with Fomapan 100. To really get the longer exposure times, I brought with me what I thought to be a four stop ND-filter, but what turned out to be a three stop red filter.

My Zeiss Ikon Nettar Medium format 6×6 bellow camera.

Having already made the effort, and trotted myself a path towards the three waterfalls I wanted to shoot, I decided to go with the red filter, and see what results I would get in the darker forests in the early morning in May. The Nettar was placed on a tripod, and I had a cable release to avoid camera shake on longer exposures. I did some metering, and used an app to calculate the correct exposure times. For Fomapan 100, the Schwarzschild effect becomes important from shutter speeds at 1 second. Since I shot most of mine at longer times, I used the cable release all the time.

Reklamer

I had some happy time shooting this roll, and I struggled my way through tree roots and forestland with threes that had fell down over the winter. But when I went for the last three pictures, on a little view-point above the biggest of the water falls. I noticed a «marked» path around the whole area. At least I got some unusual angles in my shots. I cannot imagine that anyone else have been where I went that morning.

Zeiss Ikon Nettar w three stop red filter, f22, 4 seconds exposure time. Fomapan 100 Xtol Stock 5 minutes

When I pulled the developed negatives out of the tank, I was surprised to see how «normal» they looked. I had pictured a more contrasty result from a red filter than what I got in this shoot, and I did not really think a lot about these images before I started working with them in the darkroom a few days ago.

I realized that they were actually quite interesting, and that the three stop red nearly gave me an «infrared» look in my shots. I have no huge experience with infrared photography, but I do like the effect it gives, and I will most likely do more of that in the future.

Reklamer

I also love the way the greys and whites create a dramatic scene and that it puts its emphasis on the silky water effect, creating a more dramatic look than I expected. Maybe the misplaced «red filter» was actually a good idea for this shoot. I do at least see this as a happy mistake. And I got to see a side of Fomapan 100 that I did not expect. The Infrared-ish side.

Aiming at contrast and grain

I haven’t really done any contrasty BNW-stuff for a while, and the other day I loaded a roll of StreetCandy ATM400 into my little Petri Racer and brought it with me for some days, aiming at whatever caught my eye wherever I was at the time. I haven’t used the Petri Racer for a while, and I found this was an option to use it and its little, interesting lens.

The Petri Racer is a little rangefinder camera that I have used a lot on this blog. It was the camera that made this blog happen and the camera I used for my first two entries. I am very happy with the way the Petri makes the world look. It has a special tone to it that I cannot really put my finger on.

My first pictures for this entry were taken a few minutes after it stopped raining at a car-park when I filled my coffee-cup in the nearby petrol station. I experimented somewhat with the DOF on these images, and they are shot around f4 on the little 40mm lens. My favorite one is here:

Petri Racer, StreetCandy ATM400@400 – Rodinal 1+25, 6 minutes

As I aimed for the contrasty and somewhat grainy look on this roll, I went for a pretty concentrated dilution of Rodinal; 1+25. I guessed this dilution to give me the maximum accutance and give me deep and sharp contrast as well as the lovely Rodinal grain. I don’t really mind the grainy structure of Rodinal, and I find it to suit these kinds of images as it gives them a raw impression.

Reklamer

A bit later that day, I went to an old, derelict school building to set up for the shoot mentioned in a previous entry. The first thing I noticed was the interesting lights in the old hallway. Filled with old chairs, a ladder, dirt and the smell of old building, it really gave an incredible shot. I shot this one on a tripod using f5.6 for 1/2 of a second, and I find that this shot shows the mood of the hallway well.

Petri Racer – Streetcandy ATM400@400 – Rodinal 1+25 6 minutes

Then I went to an old museum where someone had backed their Tractor-trailer into a ditch. There were some interesting contrast to be captured there and I went for it.

Petri Racer – Streetcandy ATM400@400 – Rodinal 1+25 6 minutes

All in all I am very happy with this roll of film. I got the grain and the contrast that I wanted, and the little Petri got another run. Shame it hasn’t been used for a while. It will not sleep as long this time.

Vintage shoot with Frida and her old Ford

Analog photography is has the loveliest tones imaginable for vintage style photography. The special look an old lens gives is an exquisite vibe to your photo that no digital preset can really copy, and the feeling of doing this with vintage equipment adds an extra element. Photography is not just about the picture, but the way to get there and the feeling of the process.

Yesterday I went out to photograph my friend Frida and her lovely 1950 Ford Shoebox. To go with me for this shoot, I chose two cameras. The Weist SL-35 and my lovely TLR, the Zeiss Ikon Ikoflex. Both these cameras are reasonably accurate and has sharp lenses that does really bring out that «vintage feel». I rolled up both cameras with Ilford FP4 Plus, A film that for me is my first choice when I want that «Vintage feel». This film has a really fine cubical grain structure, and has a more visible grain than other films around its speed, and I love how this grain structure affects the images.

My equipment for this shoot. Zeiss Ikon Ikoflex medium format TLR and the Weist SL-35, 35mm M42 SLR.

We met at a lovely location in Kapp just south of Gjøvik. This location used to be a condensed milk factory back in the days, but today it is used for cultural purposes among other things.

Reklamer

We first set off with the Ikoflex. I shot as close to f4 as I could get, and did some bracketing with f5,6 to be sure not to overexpose too wildly. I shot the Ikoflex at its highest shutter speed around 1/300th of a second, but my guess is that this shutter speed is a bit slower. Probably around 1/250th which is still very good for a 70 year old camera like this.

I refer to the Ikoflex as «the bird box» and this is one of my absolute favorite camera in use. When I bought it, it came from a Swedish Zeiss collectors house, and the seller did not believe that it worked. Probably because he didn’t really understand how it works. These cameras have their specific way of use, and you will not be able to shoot this camera if you don’t know how to load film in it and how to set it up.

When we were done with the film in the IKOFLEX, I changed it for some Kodak Portra 160, but these images are not included in this entry.

Reklamer

We then set off with the Weist and its exquisite Weistar 135mm lens. I also shot this one as close to F4 as I could to get that lovely bokeh you get from this lens. This is the first time I tried this camera and lens for a shoot with a model, and I am very happy with how it performed.

These are just quick scans of the negatives. This shoot will be finished as Darkroom prints. Whether the prints and the process of making them will be entered in this blog is yet to be decided.

All in all, I am very happy with how both cameras performed during this shoot and I feel humble and lucky for being allowed to with with people like Frida, who is on board with the analog nerdity.

Photographs open doors into the past, but they also alloq a look into the future

Sally Mann

Double tryout

A few months ago, I ordered a few rolls of StreetCandy ATM 400 off their own website. From previous experience I know that street film is very contrasty and that they are great to pull. I put one of the rolls in a new camera that I bought and planned to take it for a little spin around the area, looking for architectural shapes, trying to find shadows and deep contrasts. The trip did not happen because of Norwegian summer and some weeks of rain and dull weather.

The other day though, I went out for a hike in the forest looking for some sheep and forest details to photograph. I decided to try out the Street Candy at box speed for this trip, and I shot the whole roll of film that was in my camera.

The Camera

I love old, interesting and manual cameras. I often frequent thrift-shops and charity shops to see what kinds of old, forgotten and dusty stuff they have on their shelfs. On a recent trip to a local charity shop, I picked up a Weist SL35 with a «Super Weistar 135mm» lens. I have tried to google the camera, but not much came up. The best lead is that it could be a rebadged Chinon CX. Nonetheless, it is heavy as a brick and feels sturdy and solid in your hand.

I am happy for any details on this camera, as I do not know much about it other than that it seems to work perfectly and accurately. Even the lightmeter is working and fairly accurate based on this shoot.

Reklamer

This was my first time trying out this camera, and I must say that this camera will become a frequent companion for me. the M42 screw mount makes me able to use some of my favorite lenses, and it is surely more accurate than my Zenith Olympic Edition.

The film

As I stated earlier, the film I used on this trip was a Street Candy ATM400 street film. You can buy it from the manufacturer’s own website and at a fairly decent price. Be aware that they use the slowest shipment partner you can imagine. From their address in France to mine in Norway, it used more than two months. I have tried to imagine how that can even be possible. In the current Covid-age I could have traveled to France, stayed two weeks in quarantine, picked up the film, traveled back to Norway, stayed two weeks in quarantine. This whole process would have been a quicker way of getting the film, than using their shipment partner.

My guess is that their films are delivered by just one man, picking the film up at their address, walking to a port somewhere in southern France. Who then jumps in a rowing boat, rowing around Gibraltar and over the Nordic Sea to deliver it. Probably.

Reklamer

From their own website, you can learn something about this film. It is a medium speed, 400 ISO, film originally made for surveillance cameras to keep people safe. In the modern days, these systems have turned digital, and the films are unnecessary. Street-Candy has made this film available for film photographers to use, and I am truly grateful. This film is great, even when I took it out of its comfort zone and into the first.

Not what it was originally made to photograph.

The grain-structure is beautiful and very fine for a 400 ISO film, but as most other street films, it is very contrasty. In my negatives I saw the contrast immediately, and some were to contrasty to turn out anything in this setting, and a normal Tri-X or HP5 would maybe be a more suitable choice for this kind of shoot, but some of the results were really unique.

On Street-Candy’s website, it advised to refer to the same development cycle as for Ilford HP5 plus, which I did on this cycle. Eight and a half minutes in Xtol 1+0 and then normal stop and fix, rinse and Photoflo.

Reklamer

I am looking forward to trying out my other rolls of this film both for proper street photography and pulled one stop for portraits. I can imagine brilliant results from this film. I am also surprised to see how well it coped in the forest with the sheep and structures I found out there

All in all I am very happy with both the camera and the film, and if I would order this film again. If you come over a Weist SL35 at a decent price, it is worth buying. My cost 35 Norwegian kroner, approx 3,5 Euros.

There are always two people in every picture: the photographer and the viewer.

Ansel Adams

Zeiss Nettar and color film?

One of my absolute favorite cameras is my Zeiss Ikon Nettar. A little German bellow-camera from very long ago. I am not sure about the real age of this camera, but I know that it is from the late 40’s early 50’s. Being a bellow-camera, the shutter is mounted in the lens, and you have no range-finder or any focus help other than your eyes or some clip-on range finder system if you want to use that. Personally, I don’t use this camera for any work that would require the most precise focus, and I usually go without measuring or using «safe» aperture settings.

My Zeiss Ikon Nettar, and a box of KODAK Ektar

Because of its age, the Novar Astigmat lens was probably never meant to deal with colour films, and especially not high saturation films like the Ektar. I was therefore curious to try it out and see how an old lens and an old camera would perform with a film like this.

To help the camera a bit, I used an UV-filter. The Nettar does not have a filter ring that can support any of my filters, so I used a cheap 52mm UV-filter and held it in place with my fingers while shooting.

The images are taken while waiting for a ferry at Forvik in Vevelstad, Northern Norway in the region Helgeland. It surprises me how well the Nettar deals with colour films, and I find the images to be really high quality.

Images are developed at home with the Tetenal C41-home system using a Paterson tank and a cheap eBay reel. Since I do not own a medium format scanner, I used my Epson Perfection V370 and scanned them in sections and glued them together in Photoshop.

I have not done any colour corrections here, what you dee is what I got, but I have removed some dust and scratches.

Thanks for reading.