Really pushing it with portraits

Sometimes you come across settings and situations where there just isn’t sufficient lighting to go smooth and grain free photography with reasonable shutter speeds and settings. Especially with living subjects, like people, you need to allow for some «life» in your model and hence use 4 seconds shutter speed. In these situations, an option is to push the film. However, when pushing film, you will lose some of the detail get increased contrast added to your images.

For this entry, I created a situation where I had very limited light, and I went for two 400 speed films which I pushed. My initial Idea was to push both of the two stops to 1600 and see what differences I could spot, but due to a change in lighting conditions, I had to do one of them at 3200, a three stop push.
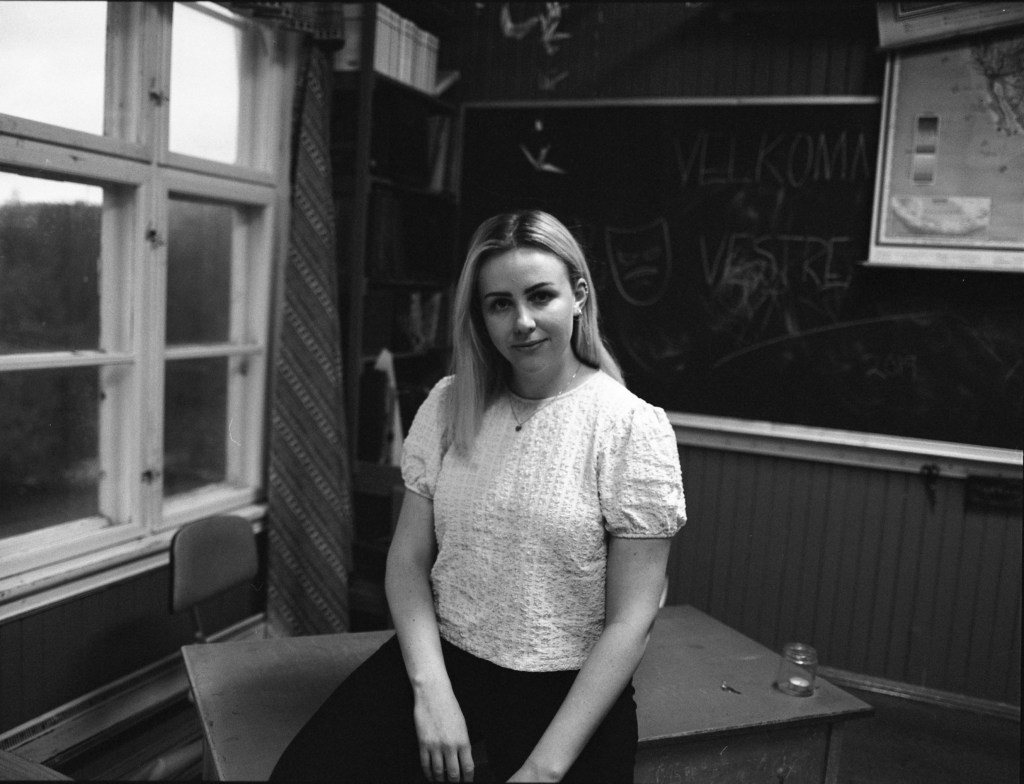
Ilford HP5+@1600

My first film for this photoshoot was a roll of Ilford HP5+ Medium format film. This is a film I regularly shoot, and I am very familiar with the characteristics of this film at both 400 and 800, but I have never pushed it further than that before. Therefore, I was curious how it would deal with the extra stop of push, both in terms of grain and contrast.

The only lighting used for this shoot was the available light in the old derelict class-room and what I could reflect back using the «sunfire»side of my reflector. I shot as close to F4 as I could and got shutter speeds around 1/60th of a second.

Reklamer

I was surprised to see the negatives when I pulled them out of the tank. I expected a very punchy-looking negative with a substantial lot of contrast and severe loss of detail, but the negatives looked reasonably good. The push was obviously visible, but not as prominent as I would have guessed. My quick scans also turned out some nice images. Although grainy, I like the look of these pictures.

I see that I got a bend mark on one of the images, I clearly was a bit unlucky when reeling the film for development.

Kodak Tri-X400@3200

If I expected grain and heavy contrast on the HP5+, I did not expect much of the images from the three stop pushed one. On my way home, I actually doubted my move and was already drafting my apology letter to the model, who friendly joined me for this experiment. I was, however surprised in two different ways.

Even though I followed the guidelines for a three stop push found in the massive dev-chart and had fresh and well tempered chemistry (20 degrees) some of these negatives came out very thin. I metered in the same way all the way through the shoot, and I obviously developed the whole roll at the same time so the big difference surprised me. I must have made a mistake with my metering at some of these images.

However, some of the negatives looked really nice. Although they were obviously very contrasty and punchy they looked to have kept at least some of the detail I looked for. As you can see in the pictures the push is very visible, and I would not go for a three stop push if it could be avoided.

This shoot was a real gamble, and I am thankful for the model who helped me on this. Although I couldn’t really compare the two films because I had to do different pushes, I must say that I am surprised how well both films coped. However, I would say that the grain and latitude of the HP5+ appeals more to me than the TRI-X. But this is a personal observation.

I have decided to try out these negatives in the darkroom at some point, and I will post my results and workflow from that at a later point.

More with Frida and the Ford

In my last entry I wrote about my vintage-style shoot with Frida and her 1950 Ford Shoebox and I added some black and white shots shot on Ilford FP4 plus. As I mentioned, I also ran a roll of Kodak Portra 160 through the Ikoflex to really get the Vintage colour feel on some of the images.

The Kodak Portra is a low-saturated colour-negative film specifically made for obtaining the absolute most beautiful skin tones, but I also adore the effect it gives on scenery and backgrounds. With its soft greenish pastel tones it gives the true feeling of a vintage colour shot. The current emulsion was launched in 1998 following the professional Vericolor-series, and it was intended to be used in the professional market by wedding photographers and portrait photographers.

Running a colour film through an old camera with an old lens is always interesting. You never know how the old lens will cope with the colour reflections. It can seem as my Ikoflex enhances green somewhat, and gives a nearly «marine» colour palette.

Reklamer

Again I am very thankful and happy to have a friend like Frida, who is as passionate about vintage and keeping the old alive as I am. Her outfit and car matches this shoot in the most exquisite way, and helps the Ikoflex make the Kodak Portra shine.

Based on the limited shutter speed on the Ikoflex, I had to set my apertures wisely. Because of age, My Ikoflex has only three properly working shutter speeds, 1/300, 1/100 and 1/50. I would also guess that the B-mode works, but I have not yet tried it. Because of this I had to shoot with smart apertures to get the pictures I wanted. The Through the window portrait is shot at maximum aperture F3,5 at 1/100, while the picture next to the car was taken at somewhere between f4 and f5,6 at 1/300 to keep some detail in the background.

No colour corrections are done after scanning. The shots are in colour as the Ikoflex shot them. My only corrections are some contrast correction, and obviously some dust removal.

Thank you for reading. Stay tuned for more fun stuff coming up soon.

JCH Streetpan 400 for portraits?

A little while ago, I was given a roll of 120mm film from Japan Camera Hunter named the «Streetpan 400». I tried it out and got beautiful results with high contrasts and exquisitely fine grain for a 400 iso film. The deep contrasts got me thinking. How would this film work for portraiture?

I bought a few rolls directly from JCH in Japan, and due to the Covid 19 situation it took a while for them to arrive. When it finally came I put a roll in my Zeiss Ikon Ikoflex, cheap TLR, and decided to bring it to take some portraits with Ada. We met at Kremmerodden, a lovely location in Norway and took some pictures.

The Zeiss Ikon Ikoflex, with a roll of JCH Street Pan 400

I decided to shoot the film at 200 and develop a bit shorter (pull processing) in order to retain some shadow detail. This film is widely discussed online for its ink-black shadows and high contrast, and for portraits in direct sunlight, this was not my biggest wish.

I will not go deep into anything technical about this film, I am no expert on emulsions and films, and there are millions of reviews and opinions about it available online.

I was very uncertain about how this film would handle being pulled a stop, but I am happy to report that it deals well with one stop over exposure.

My process was:

  • One minute presoak in water to remove the anti-halation layer. This water comes out nearly black.
  • Development in Kodak Xtol 1+1. Development time for this film at 400 is 17 minutes. Since I pulled it one stop, I reduced the development time by 20% and a total development time at 13 minutes 40 seconds with agitation every minute.
  • Water-stop and fix as usual
  • 15 minutes under running water for wash.
  • Final wash with Photoflo

I am happy with the results. What you see here are scanned negatives that have been merged and somewhat cleaned in Photoshop. I will take some of these negatives to the darkroom for printing there later.

Do I like this film for portraits? Yes. I would use this film again for portraits and pull it to 200 for certain portraits. Especially portraits where I want to retain some contrast and get a nice palette of grey. However, for portraits at this location, I’ll probably stick with Ilford FP4 box speed or Kodak Tri-X at 200.

Thanks for reading

“The camera is an instrument that teaches people how to see without a camera.” 

Dorothea Lange

A little test with Kodak Portra 160

For the past years, I have mostly shot digital when doing portrait shoots and other important shoots that involve use of colour. On my recent holiday trip to Denmark, I came across an old fashioned photography shop where they had a sale on «soon to expire» films. On this sale I found a five-pack of Kodak Portra 160, and I decided to give it a go.

I am one of those people who loves to develop films and I decided that colour or B&W, I’ll master the process myself. I did Colour development a few times some years ago, and knew more or less what I was going into, with water baths and temperature control. For chemistry I bought the Tetenal Home kit, which I have to say was really easy to use and fairly idiot proof if you do monitor the temperature.

I stuck the Kodak roll into my Nikon F80, and brought it to a TFP-shoot with the lovely Hedda and her guitar. The Portra is well known for giving the nicest skin tones and I was curious about this as well.

Hedda and her Fender caught on Portra 160

I shot the film at box speed and kept it as I normally keep exposed film for a few days until I had the time to develop it.

I was amazed how simple and straight forward the Tetenal process really is. Remembering earlier experience with C41 as rather difficult I had no problems at all mastering this process. I used a Paterson tank and used the «stirring tap» to rotate the reel in the tank, as the process is made for rotation.

I am very happy with how the images turned out. The images you see here are untouched and straight from the Plustek Scanner I use for all my entries.

You can master any process.

“A portrait is not made in the camera but on either side of it.”

Edward Steichen